Klikk HER for å laste ned som PDF..
Getting Acquainted with Frequency Separation Retouching for Headshots
by Damian Battinelli
September 25, 2014 —
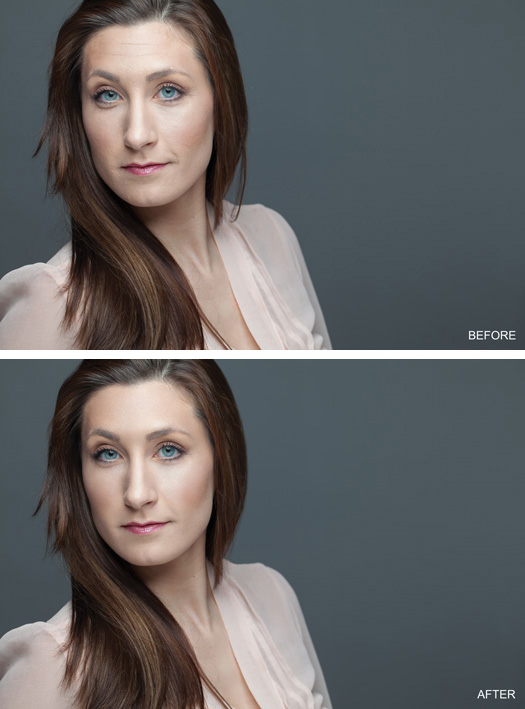
When it comes to retouching faces for headshots, gone are the days of blurring skin for a smooth, plastic look. As a retoucher, I’m always asked to produce natural-looking skin that still contains texture.
A popular technique I use to achieve this is frequency separation, or using two layers—one for texture and one for tones—to independently retouch various skin concerns. Here’s how I do it in Photoshop.
The Setup
If you’ve already been working on your original image and you’ve given the image a tone, you’ll need to create a Stamp Visible layer by pressing CMD+ALT/OPT+SHIFT+E. This creates a layer of what’s seen on your screen, and won’t flatten your layers. Rename this new layer ORIGINAL. Otherwise, if you’ve opened a new image and haven’t edited it yet, its default name is Background.
Step 1: Make a Dupe
Begin by making two copies of your background or original image by selecting the layer and pressing CMD+J twice. For organizational purposes, rename your new layers (I recommend naming the bottom layer “TONES” and the top “TEXTURE,” or something that makes sense to you).
Step 2: Blur it Out
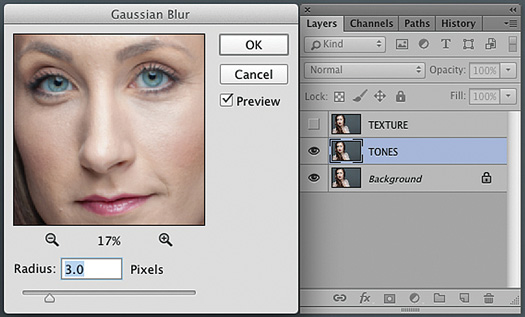
Turn off the TEXTURE layer by clicking on the eye to the left of the layer. Select the TONES layer and add a blur. In your menu, go to Filter > Blur > Gaussian Blur. You want to add just enough blur to smooth out your tones by sliding the radius to the right, then click OK.
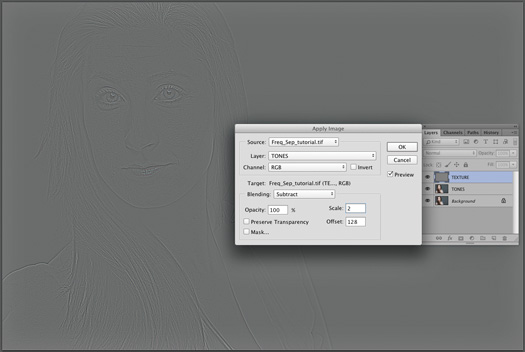
Now turn on your TEXTURE layer and select it. In your menu, go to Image > Apply Image. Set the Layer dropdown menu option to your bottom (TONES) layer. Change the Blending mode dropdown menu option to Subtract. Set the Scale to 2 and the Offset to 128. These numbers will always be the same. Now, click OK.
Step 3: Light Work
Jumping back over to your layers panel, make sure the TEXTURE layer is still selected, and change the blending mode to Linear Light. The blending mode dropdown menu option is found at the top of your layers panel.
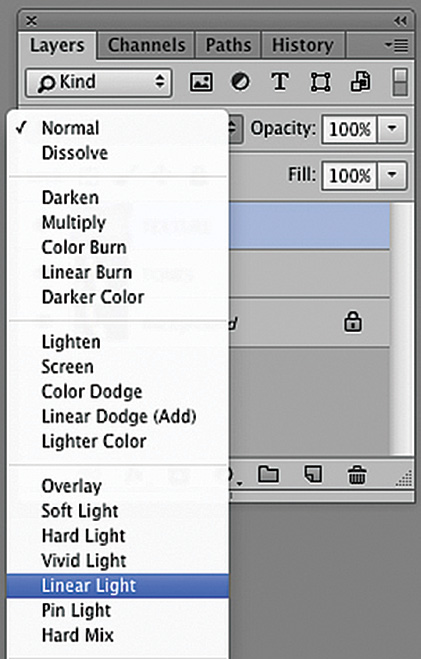
The default is set to Normal. You’ll notice that the image now looks like the original, which is exactly what you want!
Step 4: Group It
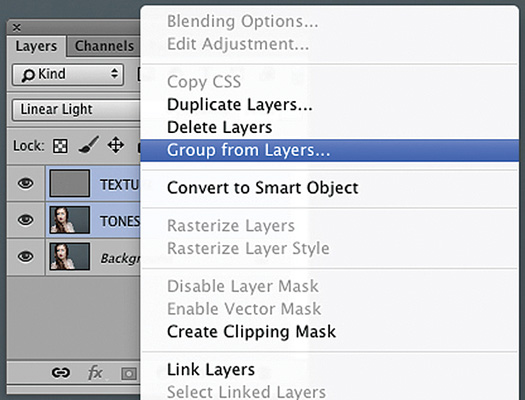
Grouping these two layers will help you stay organized. Hold down Shift and select both layers. You can either right click your mouse or press the icon that looks like four lines and an arrow pointing down, located at the top of your layers panel. Select the option “Group from Layers…”
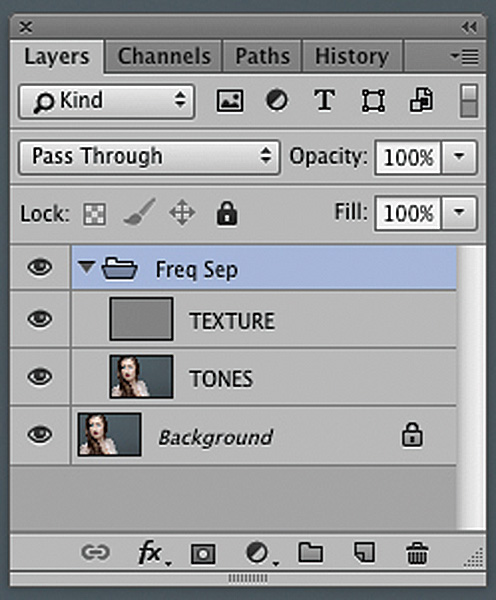
Here, you’ll only want to give it a title—I recommend calling it “Frequency Separation,” but you can name it anything that makes sense. Don’t change any other option, and click OK. You’ll see that it has now placed your layers within a folder that can be toggled on and off as a whole by clicking the eye icon to the left of the group. Your layers are still editable and can be seen by clicking on the arrow to the left of your new folder. Cool, right?
Step 5: Magic Happens
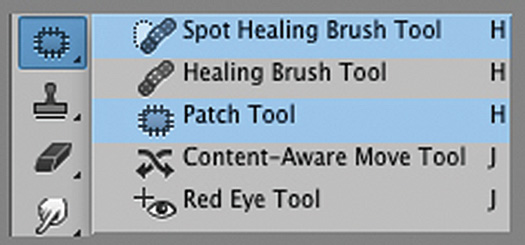
Now that we’re set up, lets make magic. Think of frequency separation like this: The top layer we called “TEXTURE” will contain textures such as skin creases, dryness, hairs, etc.; the bottom layer, “TONES,” contains the tone and color such as blemish redness, age spots or hair color. There are a couple of tools you can use, but I like to bounce between the Patch and Spot Healing Brush Tools. Just make sure not to be overindulgent with these tools.
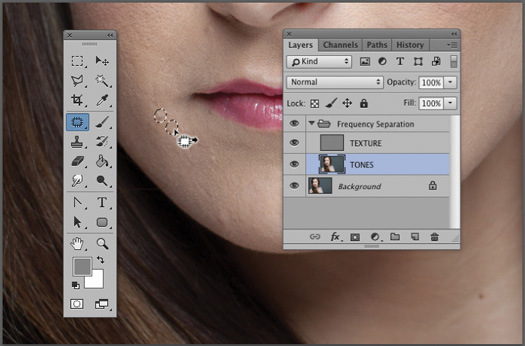
I tend to work on fixing the tones first (like redness from blemishes) and then remove the texture if needed. Select your TONES layer and then the Patch tool located in your tool panel. Select just enough tone to be able to remove it by circling the area (too much can cause a mess). With your selection made, drag it to an area similar to the tone it should be, and let go of the selection. Usually it’s within the immediate local area.
Step 6: The Details
You may notice an unwanted, leftover texture—a hair, crease, or even dry skin—so you’ll want to switch to your TEXTURE layer while the area is still selected. Your goal is to drag the selection while on this layer to a texture that is similar, or replace it with what’s supposed to be there. A shortcut for switching between layers is ALT/OPT+, depending on which way you need to go. To save time, I keep one hand on my keyboard to switch between layers and the other on my pen. Sometimes, I switch to the Spot Healing Brush Tool for small or thin areas where I don’t want to disturb other pixels. On the appropriate layer, I brush with the smallest brush possible with precise strokes. Play around with these tools; they aren’t the only options, just what I prefer to use in my workflow.
Damian Battinelli is a headshot photographer, retoucher and associate for PH2PRO. He’s also creator of “Photo Throwdown,” an interactive video series. Email your retouching questions to damian@damianbattinelli.com.
A popular technique I use to achieve this is frequency separation, or using two layers—one for texture and one for tones—to independently retouch various skin concerns. Here’s how I do it in Photoshop.
The Setup
If you’ve already been working on your original image and you’ve given the image a tone, you’ll need to create a Stamp Visible layer by pressing CMD+ALT/OPT+SHIFT+E. This creates a layer of what’s seen on your screen, and won’t flatten your layers. Rename this new layer ORIGINAL. Otherwise, if you’ve opened a new image and haven’t edited it yet, its default name is Background.
Step 1: Make a Dupe
Begin by making two copies of your background or original image by selecting the layer and pressing CMD+J twice. For organizational purposes, rename your new layers (I recommend naming the bottom layer “TONES” and the top “TEXTURE,” or something that makes sense to you).
Step 2: Blur it Out
Turn off the TEXTURE layer by clicking on the eye to the left of the layer. Select the TONES layer and add a blur. In your menu, go to Filter > Blur > Gaussian Blur. You want to add just enough blur to smooth out your tones by sliding the radius to the right, then click OK.
Now turn on your TEXTURE layer and select it. In your menu, go to Image > Apply Image. Set the Layer dropdown menu option to your bottom (TONES) layer. Change the Blending mode dropdown menu option to Subtract. Set the Scale to 2 and the Offset to 128. These numbers will always be the same. Now, click OK.
Step 3: Light Work
Jumping back over to your layers panel, make sure the TEXTURE layer is still selected, and change the blending mode to Linear Light. The blending mode dropdown menu option is found at the top of your layers panel.
The default is set to Normal. You’ll notice that the image now looks like the original, which is exactly what you want!
Step 4: Group It
Grouping these two layers will help you stay organized. Hold down Shift and select both layers. You can either right click your mouse or press the icon that looks like four lines and an arrow pointing down, located at the top of your layers panel. Select the option “Group from Layers…”
Here, you’ll only want to give it a title—I recommend calling it “Frequency Separation,” but you can name it anything that makes sense. Don’t change any other option, and click OK. You’ll see that it has now placed your layers within a folder that can be toggled on and off as a whole by clicking the eye icon to the left of the group. Your layers are still editable and can be seen by clicking on the arrow to the left of your new folder. Cool, right?
Step 5: Magic Happens
Now that we’re set up, lets make magic. Think of frequency separation like this: The top layer we called “TEXTURE” will contain textures such as skin creases, dryness, hairs, etc.; the bottom layer, “TONES,” contains the tone and color such as blemish redness, age spots or hair color. There are a couple of tools you can use, but I like to bounce between the Patch and Spot Healing Brush Tools. Just make sure not to be overindulgent with these tools.
I tend to work on fixing the tones first (like redness from blemishes) and then remove the texture if needed. Select your TONES layer and then the Patch tool located in your tool panel. Select just enough tone to be able to remove it by circling the area (too much can cause a mess). With your selection made, drag it to an area similar to the tone it should be, and let go of the selection. Usually it’s within the immediate local area.
Step 6: The Details
You may notice an unwanted, leftover texture—a hair, crease, or even dry skin—so you’ll want to switch to your TEXTURE layer while the area is still selected. Your goal is to drag the selection while on this layer to a texture that is similar, or replace it with what’s supposed to be there. A shortcut for switching between layers is ALT/OPT+, depending on which way you need to go. To save time, I keep one hand on my keyboard to switch between layers and the other on my pen. Sometimes, I switch to the Spot Healing Brush Tool for small or thin areas where I don’t want to disturb other pixels. On the appropriate layer, I brush with the smallest brush possible with precise strokes. Play around with these tools; they aren’t the only options, just what I prefer to use in my workflow.
Damian Battinelli is a headshot photographer, retoucher and associate for PH2PRO. He’s also creator of “Photo Throwdown,” an interactive video series. Email your retouching questions to damian@damianbattinelli.com.
Ingen kommentarer:
Legg inn en kommentar